New Nodes
I recently decided to update some of my homelab hosts and I managed to do this at very little cost by offloading 2 of my Supermicro e200’s to fellow vExpert Paul. The below post describes what I bought why and how I have configured it.
Table of Contents
Node Choice
I have been very happy with the Supermicro Twin concept having run this for a few years. So I decided I would stick with it/ For anyone not familiar you get upto 4 compute nodes running in a 2U setup. It’s a very dense format and as a number of components are shared I believe it’s very power efficient. Looking at the available nodes on eBay and second hand marketplaces I spotted several Nutanix nodes at a decent price. I ended up buying a 3 node NX-1365-G4 setup. These came with CPU, Memory and NICs. I decided to purchase some Enterprise SATA SSDs and utilised some of the existing consumer-based SSDs I had as storage. I then purchased some SATADom’s to use as the Boot device.
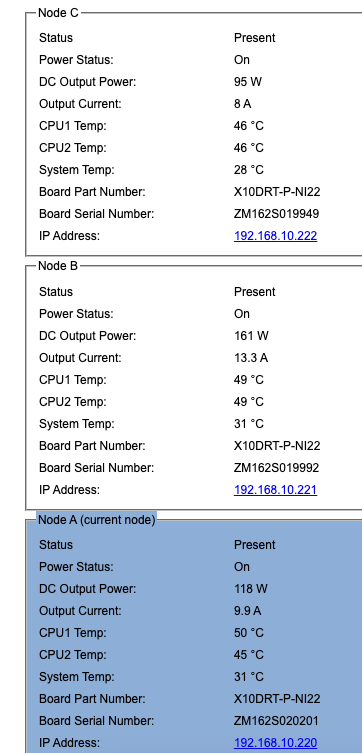
One of the really nice features is that the IPMI is sort of cluster aware. From a single location you can view the power usage (and health) of all of the nodes. In the below image I was logged into the IPMI for Node A but had a view of Node B and C.
I have chosen to deploy Nutanix Community Edition on these nodes but still retain vSphere as the underlying hypervisor. I am very familiar with this configuration having run it in a production at a service provider for a couple of years. This also gives me the additional Storage capacity of the Enterprise SSD’s something that would not be available had I chose to deploy vSAN OSA. I am not certain the hardware will run vSAN ESA but I will likely try this at some point. This also allowed me to plugin external NFS or iSCSI storage into vSphere. Something I am not certain Is possible if AHV was the underlying Hypervisor.
Bill of Materials
| Description | Quantity | Component Price £ | Line Total £ | Sourced from |
|---|---|---|---|---|
| 3x Nutanix nodes | 1 | 563.76 | 563.76 | Ebay |
| 1TB Samsung enterprise SATA SSD | 3 | 40.00 | 120.00 | Ebay |
| 2TB Samsung EVO Consumer SATA SSD | 6 | 150.00 | 900.00 | Removed from TrueNAS (Not included in total cost) |
| 32GB SATADom | 3 | 42.00 | 126.00 | Ebay |
| SSD Caddy | 9 | 10.00 | 90.00 | Ebay |
| QSFP28 to SFP+ Breakout cable | 1 | 29.99 | 29.99 | Ebay |
| Total | 929.75 |
Rescue IPMI
The IPMI in the nodes were set to ipv6 only and I didn’t know the password. To set them to DHCP was easy in the bios, however you can’t set the password from the bios. To reset the password’s I resorted to using the IPMItool. Due to some security changes in ESXi8 it was necessary to install ESXi7 to reset the password.
To do this I did a vanilla install of ESXi then uploaded the ipmitool to the datastore before running the below command
/opt/ipmitool/ipmitool raw 0x30 0x40This set the IPMI to factory defaults and took about 30 seconds to complete. From there I could configure as required.
Nutanix CE install Overview
The next step was the install of Nutanix CE. This requires deploying the installer to a suitable USB or similar device. As I wanted to utilise ESXi as the underlying Hypervisor an additional step is needed you need to have the ESXi installer ISO available on a webserver.
Its useful to plan your IP address’s in advance. This is what I used
| NODE | ESX MANAGEMENT | CVM | DNS Record |
|---|---|---|---|
| NODE A | 192.168.38.171 | 192.168.38.172 | uk-bhr-p-ntnx-a.jameskilby.cloud |
| NODE B | 192.168.38.173 | 192.168.38.174 | uk-bhr-p-ntnx-b.jameskilby.cloud |
| NODE C | 192.168.38.174 | 192.168.38.175 | uk-bhr-p-ntnx-c.jameskilby.cloud |
Web Server
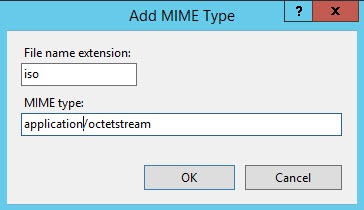
For this I used an existing windows server and added the IIS role. I then uploaded the ISO to the IIS directory. An additional step is to add the correct MIME type.
You must add the correct MIME type for the file you’re trying to download.
From IIS Manager, go to Sites > YOUR_SITE> and in the features view, double-click MIME Types.
Under actions, click Add.
Enter the file extension iso and the MIME type application/octetstream
Install
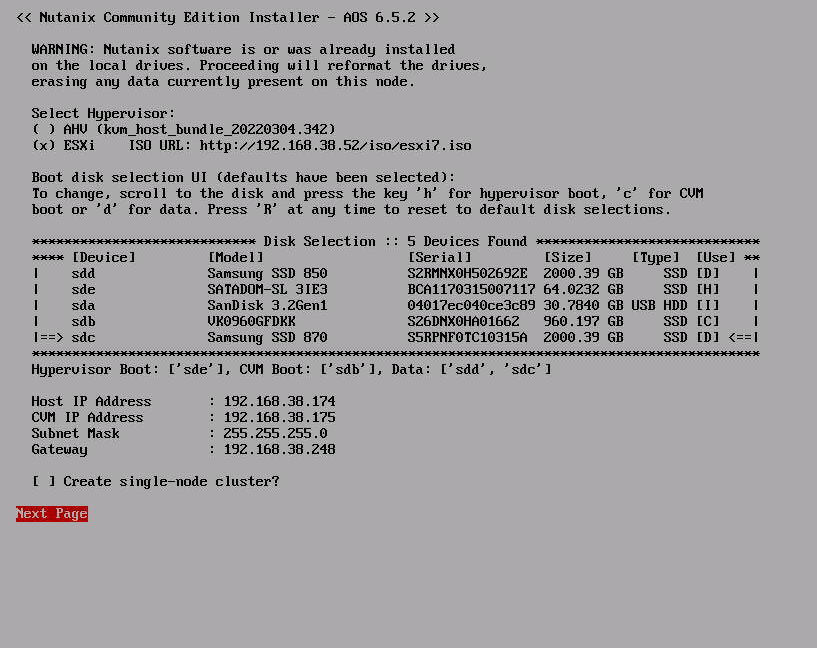
The install is fairly straight forward if your default access vlan is the one you want to run Nutanix on. In the end I changed the switch port vlan configuration to this however it doesn’t match the rest of my other VMware setup. As I wanted to create a 3 node configuration I have not selected the Create single-node cluster option.
With the ESXi option selected make sure you have the correct URL as it takes ages to time out if its incorrect. The webserver needs to be accessible from the IP range the host/cvm will be provisioned from so for ease I kept everything in the same Layer 2 domain.
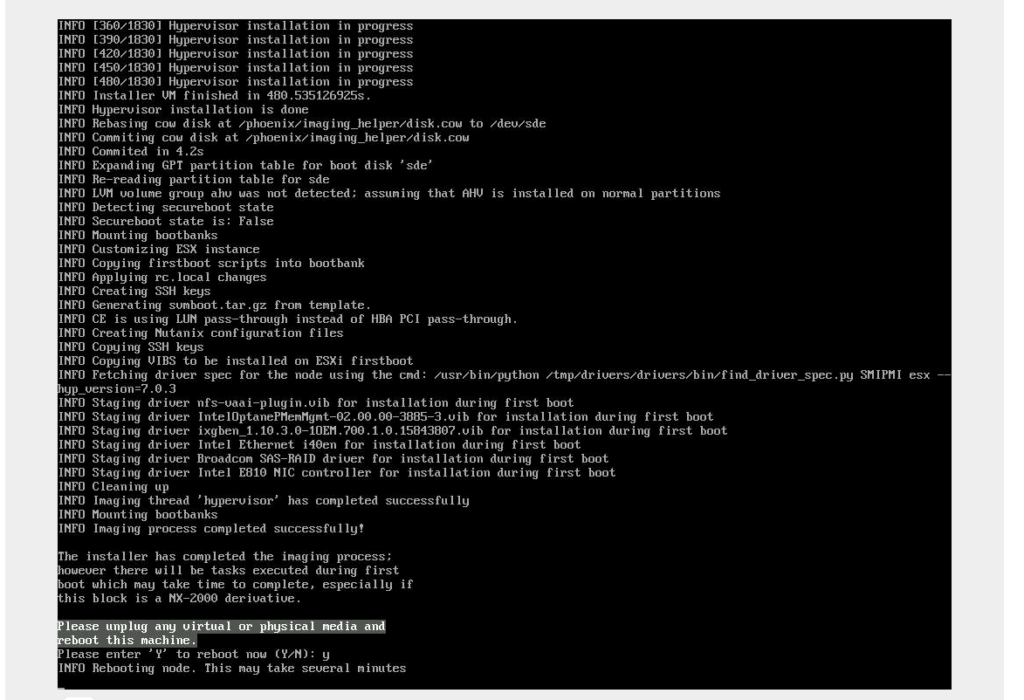
Successful Install
Once the install is complete it will ask you to reboot as seen above
It will then boot into the ESXi Hypervisor. Once this happens be patient as Nutanix will configure all of the relevant settings on the host (network config etc) utilising a kick start file. It will then deploy the CVM. The host will also restart automatically as part of this process.
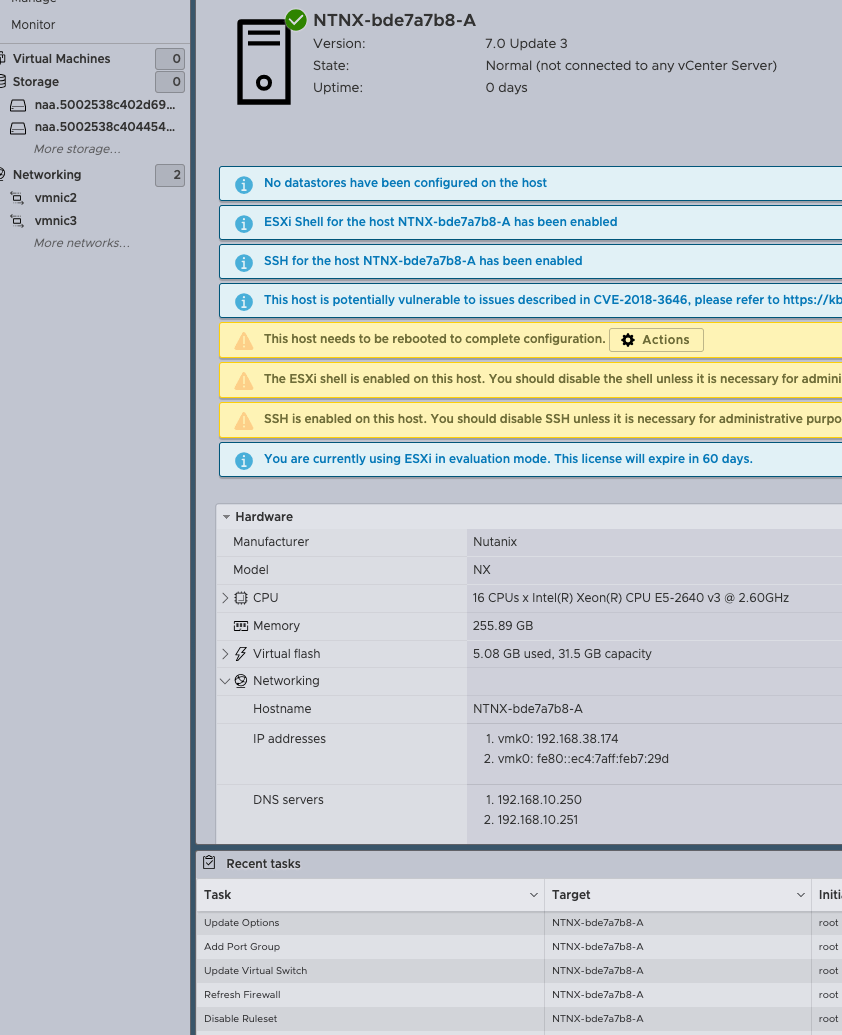
Some of the configuration taking place
Cluster Creation
When all of the nodes are imaged the next step is to create the Nutanix Cluster.
SSH into any of the CVM’s as the user nutanix with a password of nutanix/4u
Then execute the following command utilising your CVM Ip address’s
cluster -s 192.168.38.171,192.168.38.173,192.168.38.175 createCluster succeed in creating will look similar to the below.
If you have errors with this step the most likely cause is physical network configuration.
VM: 192.168.38.175 Up
		                Zeus   UP	[8656, 8704, 8705, 8706, 8715, 8733]
		           Scavenger   UP	[12061, 12187, 12188, 12189]
		              Xmount   UP	[12058, 12159, 12160, 12259]
		    SysStatCollector   UP	[14106, 14240, 14241, 14242]
		           IkatProxy   UP	[15420, 15555, 15556, 15557]
		    IkatControlPlane   UP	[16277, 16378, 16379, 16382]
		       SSLTerminator   UP	[16308, 16510, 16511]
		      SecureFileSync   UP	[16445, 16586, 16587, 16588]
		              Medusa   UP	[16665, 16804, 16805, 16807, 17410]
		  DynamicRingChanger   UP	[19169, 19305, 19306, 19346]
		              Pithos   UP	[19264, 19471, 19472, 19484]
		          InsightsDB   UP	[19340, 19550, 19551, 19566]
		              Athena   UP	[19500, 19645, 19646, 19647]
		             Mercury   UP	[27637, 27684, 27685, 27689]
		              Mantle   UP	[19616, 19873, 19874, 19882]
		          VipMonitor   UP	[22311, 22312, 22313, 22314, 22318]
		            Stargate   UP	[20732, 20844, 20845, 20853, 20854]
		InsightsDataTransfer   UP	[21521, 21609, 21610, 21651, 21652, 21654, 21657, 21659, 21660]
		               Ergon   UP	[21550, 21767, 21768, 21769, 22082]
		             GoErgon   UP	[21847, 21919, 21920, 21962]
		             Cerebro   UP	[21864, 22142, 22143, 22408]
		             Chronos   UP	[21928, 22348, 22349, 22375]
		             Curator   UP	[22404, 22625, 22626, 22704]
		               Prism   UP	[22631, 22850, 22851, 22865]
		                Hera   UP	[22852, 23014, 23015, 23016]
		                 CIM   UP	[22888, 23127, 23128, 23134, 23135]
		        AlertManager   UP	[23080, 23299, 23300, 23411]
		            Arithmos   UP	[23138, 23407, 23408, 23476]
		             Catalog   UP	[23481, 23626, 23627, 23628]
		           Acropolis   UP	[23581, 23740, 23741, 23742]
		               Uhura   UP	[23647, 23825, 23826, 23827]
		   NutanixGuestTools   UP	[23764, 23960, 23961, 23973, 24035]
		          MinervaCVM   UP	[24811, 24908, 24909, 24910, 25208]
		       ClusterConfig   UP	[24835, 25000, 25001, 25002, 25044]
		         APLOSEngine   UP	[24876, 25134, 25135, 25136]
		               APLOS   UP	[25333, 25522, 25523, 25524]
		     PlacementSolver   UP	[25404, 25593, 25594, 25595, 25616]
		               Lazan   UP	[25494, 25741, 25742, 25743]
		             Polaris   UP	[25628, 25935, 25936, 25964]
		              Delphi   UP	[25886, 26101, 26102, 26103, 26157]
		            Security   UP	[25973, 26247, 26248, 26249]
		                Flow   UP	[26059, 26352, 26353, 26354, 26375]
		             Anduril   UP	[26205, 26500, 26501, 26502, 26522]
		               XTrim   UP	[26363, 26595, 26596, 26597]
		       ClusterHealth   UP	[26679, 26775, 27021, 27022, 27030, 27036, 27095, 27096, 27101, 27103, 27104, 27125, 27126, 27128, 27136, 27137, 27138, 27139, 27140, 27142, 27226, 27227, 27251, 27252, 27253, 27254, 27257, 27258, 29422, 29423, 29425, 29426, 29428, 29429, 29430, 29431, 29433, 29434, 29435, 29436, 29451, 29453, 29528, 29531]
2024-04-05 12:48:17,004Z INFO MainThread cluster:3104 Success!
Name the cluster (Optional)
ncli cluster edit-params new-name=ntnx01Add at least 1 DNS server
ncli cluster add-to-name-servers servers=192.168.10.250VMware Config
As I wanted to add the Nutanix Hosts into my vCenter one step I needed to do was enable EVC. To do this no running VM’s can be present on the host.
Log into one of the CVM’s I executed a “Cluster Stop” command when the cluster is stopped shut all the CVM’s down.
When the CVM’s were shut down. The 3 ESXi hosts were placed in maintenance mode before adding to an existing vSphere cluster This had the correct EVC mode that I needed. Once this is done the CVM’s can be booted again and the Nutanix cluster starting with a “Cluster Start” command
Distributed Switch
I also wanted to use DVswitch within VMware so a network migration was performed.
Nutanix Further Configuration
The next steps are to deploy Prism Central and I also want to Increase the RAM in the CVM’s. I will address this in a separate post.
The finished result
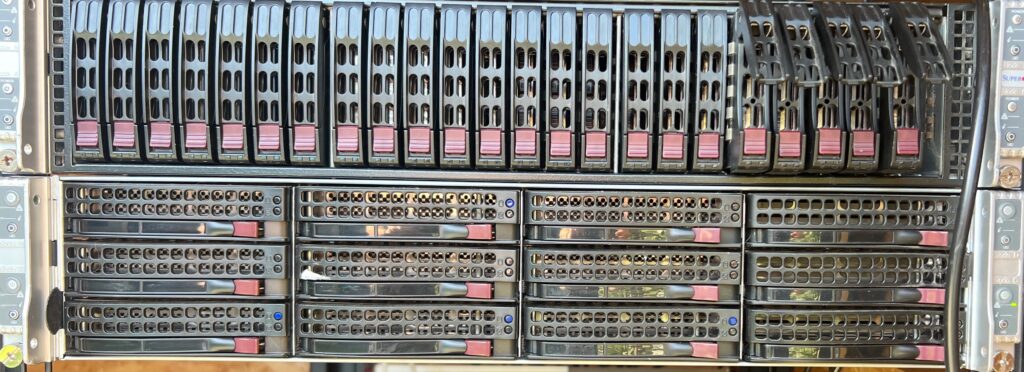
The Nutanix Nodes are the first three nodes of the lower unit. The fourth is just blanks.
