How I upgraded my blog as a Static Website with GitHub Actions and Cloudflare
I wanted to automate the publishing of my blog from the authoring side to the public side. These are some of the improvements I made.
Table of Contents
What I started with
My previous setup, involved a locally hosted WordPress instance. This runs in my homelab in an Ubuntu VM. This I will refer to as the authoring instance. Within this WordPress instance I have the “Simply Static” Plugin. When I have finished writing a post or making changes, I then hit “Generate” within the plugin. It will then scan the entire site, creating an entire copy that’s made available as a Zip download. The benefits of this setup I have discussed previously
I then take this export and copy it to a public Github repo called “WordPress”. When the code is checked in, this triggers a process within Cloudflare to publish it as a static site in Cloudflare’s CDN. I have previously written about the Cloudflare part.
What I finished with
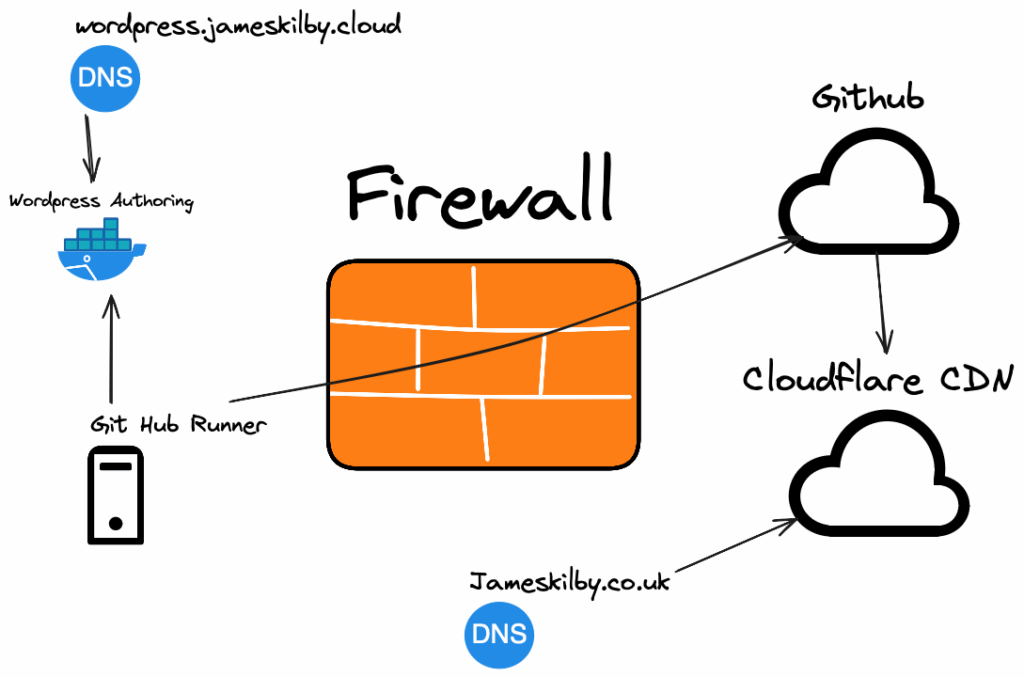
The new setup is conceptually similar in that I have maintained the authoring WordPress instance. The major difference is how the data gets from the authoring WordPress instance to GitHub. The GitHub to Cloudflare part remains unchanged.
I have introduced a GitHub runner that runs alongside the WordPress Instance. This runner has permissions to query the WordPress API to get data. Now when I have finished updating my site, I can start the runner. It then scans the site making a local copy of it and performs an automated check-in to Github.
Disclaimer: I used a fair bit of AI to help with some of the python and API calls. It also wrote the documentation for me.
How I got there
First things first, I created a new GitHub repo so that if I messed anything up, I could point Cloudflare back to the previous WordPress Repo.
WordPress API
The next step was to enable the WordPress API. This was to allow a GitHub runner to communicate directly with WordPress. I chose to do this with a plugin called REST API Authentication for WP
I then created a simple basic authentication token. This is then stored in the GitHub repo as an action secret. This allows me to have a public repo but without leaking the key.
This is done by navigating to the GitHub repo > Settings then navigate to the Security section and select “Secrets & Variables” Then create a “New Repository Secret” called WP_AUTH_TOKEN add your API token.
GitHub Runner
The next step was to deploy a runner. These can either be a GitHub-hosted runner or a local runner. I am using a local GitHub runner running on an Ubuntu machine in my lab to perform this function as the WordPress instance isn’t available publicly and therefore for the GitHub-hosted runner.
To set this up, first you need to navigate to the Actions section within your GitHub Repo and select the “Runners” section.
Ensure you have the Self-hosted runners tab selected.
GitHub then gives you easy instructions to set up the runner. First, you select the Architecture I am using Ubuntu and therefore selected Linux. GitHub then gives you great instructions.
# Create a folder
$ mkdir actions-runner && cd actions-runner
# Download the latest runner package
$ curl -o actions-runner-osx-x64-2.329.0.tar.gz -L https://github.com/actions/runner/releases/download/v2.329.0/actions-runner-osx-x64-2.329.0.tar.gz
# Optional: Validate the hash
$ echo "c5a14e84b358c72ca83bf14518e004a8ad195cc440322fbca2a4fec7649035c7  actions-runner-osx-x64-2.329.0.tar.gz" | shasum -a 256 -c
# Extract the installer
$ tar xzf ./actions-runner-osx-x64-2.329.0.tar.gzThen configure the runner
# Create the runner and start the configuration experience
$ ./config.sh --url https://github.com/jameskilbynet/jkcoukblog --token AFPWGXXXXXXXXXVHXXI7D7DM
# Last step, run it!
$ ./run.shPython
The runner is then executing a number of Python scripts as can be seen in the GitHub repo.
At a high level these:
- Discover all posts, pages, categories and tags
- Fetches the media library assets
- Replaces all WordPress URL’s as relative
- Converts WordPress Embed blocks to iframes
- Removes WordPress specific elements that are not required in the static site.
This grabs a copy of the site and then stores it in the Public directory within the GitHub Repo and issues a Git Commit and Git Push command.
When I have finished making changes in WordPress I can trigger the GitHub runner manually ( It also runs on a Cron schedule)
It typically takes about 1 minute 20 to process my site.
In that time it:
- Set’s up the job on a runner
- Check’s Out the repo
- Sets up the Python environment
- Install any relevant dependencies
- Test’s the runner environment
- Generates the Static Site files
- Commit and Pushes the Static Site
- Notifies Slack
- Executes Python cleanup
- Executes other cleanups
Build Notifications
I didn’t want to have to login to GitHub or Cloudflare to monitor progress of the runner, so I added notifications to Slack.
Create a Slack Webhook URL
First, you’ll need to create a Slack webhook. Here’s how:
- Go to your Slack workspace
- Navigate to Apps: Click on your workspace name → Settings & administration → Manage apps
- Search for “Incoming Webhooks” and add it to your workspace
- Create a webhook:
◦ Choose the channel where you want notifications (e.g., #deployments, #general) I created a web channel
◦ Click “Add Incoming Webhooks Integration”
◦ Copy the Webhook URL (looks like: https://hooks.slack.com/services/T00000000/B00000000/XXXXXXXX
GitHub Notifications
In GitHub, navigate to the secrets actions section of your repo
Add a new secret Called SLACK_WEBHOOK_URL
This will automatically get triggered by the workflow in the repo
Cloudflare Notifications
In Cloudflare, go to the Notifications settings and select Destinations.
Create a Webhook using the Webhook URL created above with an appropriate name.
Then navigate to the “Workers & Pages” section and select your static pages site. Then navigate to the settings of your workers and select the notification events that you want, and select the Webhook name created above.
While testing, I have all notifications turned on.

When I trigger the runner, I get 3 Slack notifications in my Web channel. The first is the Commit to GitHub, I then get one when Cloudflare starts building the Static site and one when it completes. One useful feature is that it gives you the preview URL so you can’t instantly view your changes without having any DNS propagation issues.
incoming-webhook
APP  10:27 PM
:white_check_mark: Succeeded GitHub Actions

8398a7@action-slack
repo
jameskilbynet/jkcoukblog
commit
4761df3f
10:27
Slack
:zap: Cloudflare Pages: A production deployment has started for jkcoukblog :zap:
Build Link: https://dash.cloudflare.com/c9bb9919eaab3686694017fa604070dd/pages/view/jkcoukblog/aeacb2b5-03c8-4771-a252-cf48b2c86da0
Commit Hash: b72489f574a14dc6aacad7c2fa1fbd874ed7fed4
Environment: ENVIRONMENT_PRODUCTION
Timestamp: 2025-10-09T21:27:53.399259Z
Cloudflare | Oct 9th
10:28
Slack
:white_check_mark: Cloudflare Pages: A production deployment has succeeded for jkcoukblog :white_check_mark:
Build Link: https://dash.cloudflare.com/c9bb9919eaab3686694017fa604070dd/pages/view/jkcoukblog/aeacb2b5-03c8-4771-a252-cf48b2c86da0
Commit Hash: b72489f574a14dc6aacad7c2fa1fbd874ed7fed4
Preview URL: https://aeacb2b5.jkcoukblog.pages.dev
Branch Alias URL:
Project URL: https://jkcoukblog.pages.dev
Show more
Cloudflare | Oct 9thUsing Utterance for Comments
I wanted to add a comment mechanism to my pages, but as it’s a static site that needs a little bit of planning as the traditional WordPress mechanisms won’t work. After a little bit of research I decided to use Utterance.
Utterance is lightweight javascript code that integrates with GitHub issues. To enable it, I enabled Issues on the repo I have been using for all of my Web stuff and then edited the WordPress theme using the built-in theme editor.
Within WordPress changed comments.php to the following
<?php
/**
 * Utterances-only comments template.
 *
 * @package Infinity Blog
 */

if (post_password_required()) {
    return;
}
?>

<div id="comments" class="comments-area">
    <div class="pb-30">
        <!-- Utterances Comments Embed -->
        <section id="utterances-comments">
            <script src="https://utteranc.es/client.js"
                repo="jameskilbynet/jkcoukblog"
                issue-term="pathname"
                theme="github-light"
                crossorigin="anonymous"
                async>
            </script>
        </section>
    </div>
</div><!-- #comments -->I also wanted a Slack notification if anyone posted comments on one of my pages. Unfortunately the payload Slack is expecting is a JSON payload in a specific format that GitHub doesn’t do by default. I therefore created a new GitHub Action to trigger the notification
Use GitHub Actions
You can trigger Slack messages directly via GitHub Actions:
- Create a GitHub Action workflow
.github/workflows/issue-to-slack.yml:
name: Notify Slack on Issue Creation

on:
  issues:
    types: [opened]

jobs:
  notify-slack:
    runs-on: ubuntu-latest
    steps:
      - name: Send Slack Notification
        uses: slackapi/[email protected]
        with:
          payload: |
            {
              "text": "New Comment Created: <${{ github.event.issue.html_url }}|${{ github.event.issue.title }}> by ${{ github.event.issue.user.login }}"
            }
        env:
          SLACK_WEBHOOK_URL: ${{ secrets.SLACK_WEBHOOK_URL }}
I am using the same SLACK_WEBHOOK_URL as defined previously so these get posted in my existing web channel.
