Automating vSphere Golden Images with Packer and GitHub Actions
Building VM templates by hand is slow, error-prone, and impossible to audit. This post walks through how I built this Packer vSphere pipeline to automate golden-image deployment for my homelab using HashiCorp Packer and GitHub Actions. Inspiration originally taken from the repo that Ryan built that I have discussed previously.
It’s designed to be a multi-stage workflow fully run from GitHub utilising GitHub Actions. Once your setup is complete it can all be driven from GitHub. Either the GitHub.com website, Mobile APP or GH command line. If you want to jump into the code it’s available here. If you’re less familiar with some of GitHub it might make sense to read on.
Table of Contents
What you get
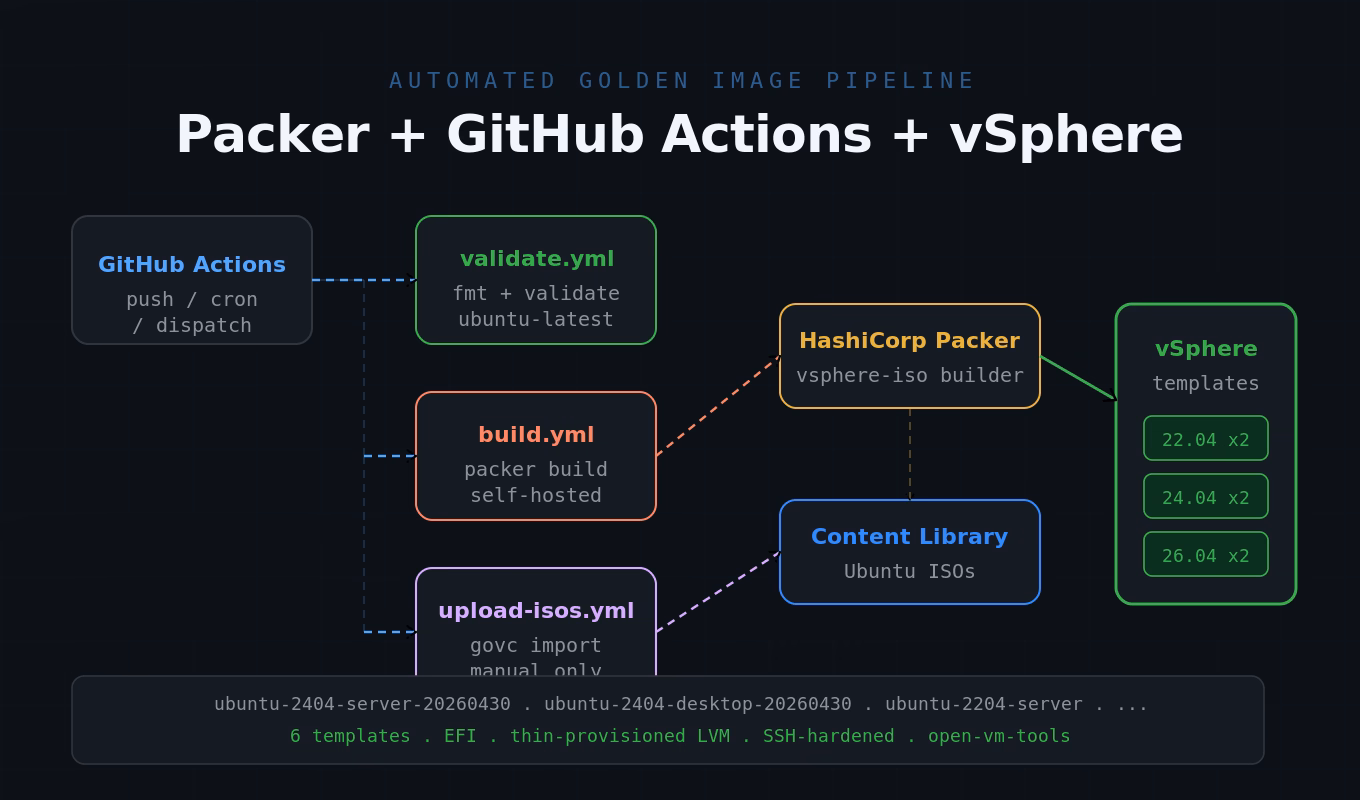
What you get is a hands-off delivery of Ubuntu-based golden images, built using Packer, all driven from GitHub Actions. Each run produces up to six vSphere templates:
| Ubuntu version | Server | Desktop |
|---|---|---|
| 22.04 LTS (Jammy Jellyfish) | 2 vCPU / 4 GB / 40 GB | 4 vCPU / 8 GB / 60 GB |
| 24.04 LTS (Noble Numbat) | 2 vCPU / 4 GB / 40 GB | 4 vCPU / 8 GB / 60 GB |
| 26.04 LTS (Resolute Raccoon) | 2 vCPU / 4 GB / 40 GB | 4 vCPU / 8 GB / 60 GB |
All templates use EFI firmware, pvscsi storage, vmxnet3 networking, thin-provisioned LVM disks, and ship with open-vm-tools, SSH hardening, and zeroed free space for compact storage. Hardware sizes are fully configurable via variables.
How the Packer vSphere pipeline works
The pipeline has three major logical stages:
- Retrieve downloads from Ubuntu.com and upload them to vSphere Content Library
- Build Ubuntu Server and Desktop templates and validate the template is healthy
- Lifecycle the template

Upload ISOs to Content Library
The first step is to get the ISOs you need and make them available to Packer for building.
The GitHub Action requests a runner to connect to releases.ubuntu.com, download the required ISOs, validate the SHA256 checksum and then upload them to a vSphere Content Library. The Content Library will be created if it doesn’t already exist. The name can be customised if needed.
This script is idempotent — if an ISO already exists it will be skipped. This typically takes about 15 minutes.
Build Packer templates
The build process is a multi-step process. When running the action manually you are asked which VMs you want to provision. It’s possible to select individual VMs, a whole Ubuntu family, or all six. The same workflow also runs on a weekly cron so your templates stay up to date without manual effort.

Once the selection is done the first build step just determines which files are required for the provisioner. The next step validates that the VMware environment is available and healthy and that sufficient disk space is available for the build. It also checks that all required secrets are defined within GitHub
If the VMware environment is healthy the build step starts. Packer builds in parallel within a family — the 22.04 server and desktop VMs are built together before moving onto 24.04 and finally 26.04. In my environment each family takes around 25 minutes.
If the build process fails for any reason the VM is deleted, but not before a screenshot is captured and the Packer logs are extracted and uploaded to GitHub as an artefact to aid in troubleshooting.
Template conversion
Once provisioning completes, Packer converts the finished VM to a vSphere template. The template is named ubuntu-<version>-<type>-<YYYYMMDD> (e.g. ubuntu-2404-server-20260429) and placed in the folder specified by the vsphere_folder variable. A build manifest JSON is written to GitHub manifests recording the template name and metadata. This data is also added to the notes of the VM in vSphere.
Testing
After the provisioning step is complete, GitHub Actions deploys the VM from the newly created template and executes a smoke test plan against them. This validates that not only was the VM built, but that it is usable.

An example failure that I discovered in testing was
# smoke-test.sh — example failure when the clone never reports an IP
Powering on VirtualMachine:vm-63090... OK
==> Waiting up to 600s for VMware Tools to report an IP...
==> Mid-wait screenshot (312s in, no IP yet) → ./smoke-screenshots-2404-desktop/smoke-ubuntu-2404-desktop-20260529-26645739266-midwait.png
    ✔ mid-wait shot saved
❌ Clone did not report an IP within 600s
On failure during testing the system will also take a screenshot and save it, this can help with troubleshooting later. In this particular instance it was a Netplan issue. Netplan at install time rendered a config with the install-time MAC baked in. On the clone, ens33 had a fresh MAC, neither renderer’s config matches it.

Concurrency and safety
The build workflow uses a concurrency group (packer-build) with cancel-in-progress: false, so a queued run waits for the current one to finish rather than being cancelled. This prevents two jobs from racing to create VMs with the same name in vSphere.
Secrets management
vSphere credentials, build credentials, and ISO paths are stored as GitHub Actions Secrets, added in GitHub via Settings → Secrets and variables → Actions → New repository secret (or via gh secret set on the CLI). Once stored, a secret is write-only — gh secret list confirms a name exists but the value is unrecoverable; the only way to change it is to set a new value:
# rotate the build password secrets via the gh CLI
gh secret set BUILD_PASSWORD                # prompts for the new value
gh secret set BUILD_PASSWORD_ENCRYPTED < <(openssl passwd -6 'newpassword')Two optional secrets control admin account creation in the template: ADMIN_USERNAME sets a persistent named account to create (leave empty to skip), and ADMIN_GITHUB_USER sets the GitHub username whose public SSH keys are imported into that account via ssh-import-id-gh. If these secrets are absent or empty, no admin account is created — the build still completes normally.
Project structure
# repository layout — Packer sources, scripts, goss specs, workflows
packer/
|-- packer.pkr.hcl              # Packer >= 1.14.0; vsphere plugin >= 2.1.2
|-- variables.pkr.hcl           # All variable declarations
|-- locals.pkr.hcl              # Shared expressions
|-- ubuntu-2204.pkr.hcl         # Ubuntu 22.04 server + desktop sources
|-- ubuntu-2404.pkr.hcl         # Ubuntu 24.04 server + desktop sources
|-- ubuntu-2604.pkr.hcl         # Ubuntu 26.04 server + desktop sources
|-- templates/
|   |-- server-user-data.pkrtpl # Cloud-init autoinstall config - server
|   `-- desktop-user-data.pkrtpl
|-- scripts/
|   |-- upload-isos.sh          # Download ISOs to Content Library
|   |-- check-iso-updates.sh    # Detect new Ubuntu point releases
|   |-- vsphere-preflight.sh    # Pre-build env health check
|   |-- lint-user-data.sh       # Validate cloud-init user-data
|   |-- setup.sh                # Post-install: upgrade, SSH hardening, host-keygen unit
|   |-- desktop.sh              # Installs ubuntu-desktop-minimal on desktop builds
|   |-- finalize.sh             # Final clean-up before template conversion
|   |-- vmtools.sh              # Verify / install open-vm-tools
|   |-- goss-validate.sh        # In-build goss assertions
|   |-- smoke-test.sh           # Post-publish: clone template, boot, re-run goss
|   |-- quarantine-template.sh  # Move failing template to a quarantine folder
|   `-- prune-templates.sh      # Retention policy: keep last N per (version, role)
|-- goss/
|   |-- server.yaml             # In-build assertions (server)
|   |-- server-clone.yaml       # Post-publish assertions (server)
|   |-- desktop.yaml            # In-build assertions (desktop)
|   `-- desktop-clone.yaml      # Post-publish assertions (desktop)
|-- docs/
|   `-- operations.md           # Operator reference: runner, perms, troubleshooting
|-- manifests/                  # Build manifests written here after each build
`-- .github/workflows/
    |-- validate.yml            # PR: packer fmt + validate + user-data lint
    |-- pre-commit.yml          # PR: gitleaks, yamllint, shellcheck
    |-- build-templates.yml     # Build + smoke + quarantine
    |-- upload-isos.yml         # Manual: ISOs to Content Library
    |-- check-iso-updates.yml   # Weekly: detect new Ubuntu point releases
    `-- rotate-templates.yml    # Monthly: retention prune
Why bother
A few things this pipeline gives you that manual template builds don’t:
- Reproducibility — every template is built from the same HCL source, the same provisioner scripts, and the same Ubuntu ISO. No “I think I installed that manually last time.”
- Up-to-date templates — the weekly cron rebuild means templates always include the latest security patches from
apt upgrade, without any manual effort. - Auditability — every build is tied to a git commit. The Packer log and manifest are retained as workflow artifacts. You can see exactly what changed and when.
- PR validation — format and syntax checks on every pull request mean broken HCL never reaches
main. - No local tooling required day-to-day — after the one-time secrets setup, builds run entirely in the cloud. Useful if you work across multiple machines.
How to build this
Below are the end-to-end steps to get this running in your own environment. After the one-time setup you will not need to touch anything locally — every build runs from the GitHub Actions UI or on the weekly schedule.
Prerequisites
- A GitHub account with permission to create repositories, secrets, and self-hosted runners.
- A vSphere environment (vCenter 8.0+ recommended — the default
vm_hardware_version = 21targets vSphere 8.0 U2; lower it to 19 if you’re still on 7.0), a DHCP-enabled VM network, and an account that can create VMs, templates, and Content Libraries. - A VM to use as the GitHub runner. It needs to be Linux — I use Ubuntu.
- The runner VM needs outbound access to
github.com, access to the vCenter API on port443, and access to the VM network on port22.
Step 1 — Fork the repository
Fork the Packer repository into your own GitHub account (or an organisation).
Step 2 — Register a self-hosted runner
A runner is a machine that executes actions in your code. They can be hosted by GitHub or self-hosted. GitHub-hosted runners cannot reach a private vCenter, so the build workflow needs a runner inside your network. In your forked repo go to Settings → Actions → Runners → New self-hosted runner and follow the on-screen install instructions on your runner VM. Then install it as a service so it survives reboots:
# register and install the GitHub Actions self-hosted runner as a service
mkdir actions-runner && cd actions-runner
curl -o actions-runner-linux-x64-2.334.0.tar.gz -L \
  https://github.com/actions/runner/releases/download/v2.334.0/actions-runner-linux-x64-2.334.0.tar.gz

tar xzf ./actions-runner-linux-x64-2.334.0.tar.gz

./config.sh --url https://github.com/<owner>/<repo> --token XXXXXXX

sudo ./svc.sh installUse the token that GitHub gives you for registration. Start the service:
# start the runner service
sudo ./svc.sh startIf everything is set up correctly you should see something like:
# expected output — systemd shows the runner service active (running)
/etc/systemd/system/actions.runner.jameskilbynet-packertest.ghrunnertest.service
● actions.runner.jameskilbynet-packertest.ghrunnertest.service - GitHub Actions Runner (jameskilbynet-packertest.ghrunnertest)
     Loaded: loaded (/etc/systemd/system/actions.runner.jameskilbynet-packertest.ghrunnertest.service; enabled; preset: enabled)
     Active: active (running) since Wed 2026-05-27 23:07:35 UTC; 23ms ago
 Invocation: d1becf2fb1f3455c8f00f4b4699e91ab
   Main PID: 2247 (runsvc.sh)
      Tasks: 2 (limit: 3992)
     Memory: 976K (peak: 2M)
        CPU: 15ms
     CGroup: /system.slice/actions.runner.jameskilbynet-packertest.ghrunnertest.service
             ├─2247 /bin/bash /home/w20kilja/actions-runner/runsvc.sh
             └─2249 cat .path

May 27 23:07:35 ghrunnertest systemd[1]: Started actions.runner.jameskilbynet-packertest.ghrunnertest.service - GitHub Actions Runner (jameskilbynet-packertest.ghrunnertest).The runner user needs passwordless sudo so Packer can install dependencies during the job:
# grant the runner user passwordless sudo
echo "$USER ALL=(ALL) NOPASSWD" | sudo tee /etc/sudoers.d/github-runnerBy default the workflows target the self-hosted label. If your runner uses a different label (for example vsphere), set a repository variable RUNNER_LABEL at Settings → Secrets and variables → Actions → Variables.
Step 3 — Generate the build password hash
The build-user account inside each template is created by cloud-init with a SHA-512 password hash. Generate one on any Linux shell (the runner VM works fine) — you’ll paste both the plaintext password and the hash into GitHub Secrets in the next step:
# generate a SHA-512 hash for the build-user password
openssl passwd -6 'YourBuildPassword'Keep the plaintext password to hand: BUILD_PASSWORD takes the plaintext, BUILD_PASSWORD_ENCRYPTED takes the $6$… hash output.
Step 4 — Add repository secrets
Open Settings → Secrets and variables → Actions → New repository secret in your forked repo and add each value below. The full reference (every secret + which workflow uses it) lives in docs/operations.md → GitHub Secrets. Minimum set:
- vCenter connection —
VSPHERE_SERVER,VSPHERE_USER,VSPHERE_PASSWORD,VSPHERE_DATACENTER,VSPHERE_CLUSTER(orVSPHERE_HOST),VSPHERE_DATASTORE,VSPHERE_NETWORK,VSPHERE_FOLDER,VSPHERE_ISO_LIBRARY_DATASTORE - Build credentials —
BUILD_USERNAME,BUILD_PASSWORD,BUILD_PASSWORD_ENCRYPTED(the$6$…hash from Step 3)
If you prefer the CLI, authenticate once with gh auth login and then set each value:
# set each secret value from the CLI; the encrypted form takes a piped hash
gh secret set VSPHERE_SERVER                # prompts for the value
gh secret set BUILD_PASSWORD_ENCRYPTED < <(openssl passwd -6 'YourBuildPassword')Once stored, a secret is write-only — re-running gh secret set NAME is the only way to change a value.
Step 5 — Upload the Ubuntu ISOs
Trigger the Upload ISOs workflow from Actions → Upload ISOs → Run workflow. It downloads each Ubuntu LTS ISO from releases.ubuntu.com, verifies the SHA256 checksum, and imports it into a vSphere Content Library called Packer-ISOs (the name is configurable via the workflow input). The script is idempotent, so it is safe to re-run after a partial failure.
If you would rather upload from your workstation, set the govc environment variables and run scripts/upload-isos.sh locally — same result.
Step 6 — Run a validation workflow
Open a small pull request (or push a no-op commit) to confirm the Validate workflow passes. It runs packer fmt --check and packer validate on the self-hosted runner with placeholder secrets and finishes in under two minutes.
Step 7 — Build your first template
Go to Actions → Build Packer Templates → Run workflow and pick a target — for example 2404-server for a quick first run. Enable the dry-run toggle if you want to validate against the real secrets without actually building. The workflow will:
- Resolve the input into a build matrix.
- Run a vSphere pre-flight (vCenter reachable, datastore free space, Content Library present), then a per-leg secrets check that fails fast if any required secret is missing.
- Install Packer, run
packer initandpacker validate, thenpacker buildwith full debug logging. - Upload the build log and manifest as workflow artifacts.
- Always delete the temporary credentials file at the end of the job, even on failure.
When it finishes you should see a new template in vSphere named ubuntu-2404-server-<YYYYMMDD> in the folder set by VSPHERE_FOLDER.
Step 8 — Let it run on its own
That is the end of the setup. From here on:
- Every pull request touching a
.pkr.hclfile, autoinstall template, or provisioner script runsvalidate.ymlon the self-hosted runner. - The weekly cron job is set to rebuild all six templates every Sunday at 02:00 UTC so they pick up the latest security updates.
- You can rebuild any template on demand from the Actions UI at any time.
- The Check ISO updates workflow runs every Monday and opens a GitHub pull request with the new ISO filenames when Ubuntu ships a point release — no manual re-upload needed.

26.04 failures
Getting 22.04 and 24.04 to build was a fairly quick process — the newest version of Ubuntu has been a nightmare. I went through many builds trying to get this to work reliably.
Two fixes were needed, and together they make 26.04 builds reliable. The first is at the autoinstall layer.
Curtin (the installer that subiquity drives) was hitting a probabilistic OverlayFS kernel oops on the Resolute Raccoon live ISO — ovl_iterate_merged killed mid-install during its rsync walk of the merged live root. Setting source.id: ubuntu-server-minimal in the autoinstall user-data makes curtin use its fsimage handler instead, which doesn’t touch the OverlayFS path the oops fires on. After that change, 26.04 installs deterministically on attempt 1.
The second is a kernel command-line workaround. The Launchpad answer for the exact bug:
“After disabling the IPv6 using boot parameters the event is no longer triggered.”
Subiquity treats every IPv6 address-change event as a CHANGE event. On a bridged network (which vSphere port groups are), the live installer gets transient IPv6 link-local + SLAAC events that fire repeatedly, generating the infinite loop. Disabling IPv6 at the kernel level before the network stack initialises stops the events at the source.
The kernel parameter is ipv6.disable=1. Critically, placing it before --- in the boot command means it only applies to the live installer, not the installed OS — so clones boot with normal IPv6 behaviour.
Conclusion
The process of building this used some AI to help me with parts of the Packer side, and along the way taught me a lot about GitHub, its capabilities, and general software development practices. It took a lot longer than I expected to finish, but I’m very happy with the result.